
SL2
Posted by: S3 on 05 April 2017
Hi,
I have managed to source a pair of Maple SL2s in excellent condition which I will take delivery of next week and will run with my N272, XPS and 250DR. I have been reading numerous extremely helpful posts on the forum around set up and considerations; like, critically, the need for a solid wall to site them against. I am very excited about the SL2s but I must confess I am slightly apprehensive about the challenge of setting them up. Richard's set up instructions are very thorough and I'm sure that you really need to have the speakers in front of you to make absolute sense of them. I will be very careful in following the procedure to the letter and will take my time but I just had a couple of questions:
(i) I know that certain tools are required (mention of torque wrenches, allen keys, clamps etc). Does anyone have a definitive list of exactly what I need so I may ensure that I have the right tools for the job?
(ii) I am considering siting the SL2s on granite slabs on top of my carpet (noting the consensus that a solid floor is optimal as well as a solid masonry wall behind them). Is that worth doing or is it, as I suspect, just a case of "try it and see"?
Thanks in advance for any tips / insight.
For Naim speakers you'll be best off with Naim speaker wires. Try to pick up some A5 secondhand. Make sure you use the Naim plugs.
Go for the NACA5, as Nigel suggests. If you have to go short then try to not go less than 5m per side with SL2s. The extra length does make a difference. Then just concertina up the extra length that you don't need. Properly soldered with the Naim speaker plugs at each end is a must here.
Why spoil SL2s "but for ha'penny worth of tar"? OK, a little bit more than half a penny, but you get the point.
SL2 setup tip no. 2,549 - When centering the tweeter assembly, I found that when you tightened up the three bolts holding it in position there was a tendency for the thing to move out of position. I overcame this by using a "Helping Hand" clamp to gently hold the surfaces together, enough to allow movement but with enough pressure to ensure they didn't move when tightened :-
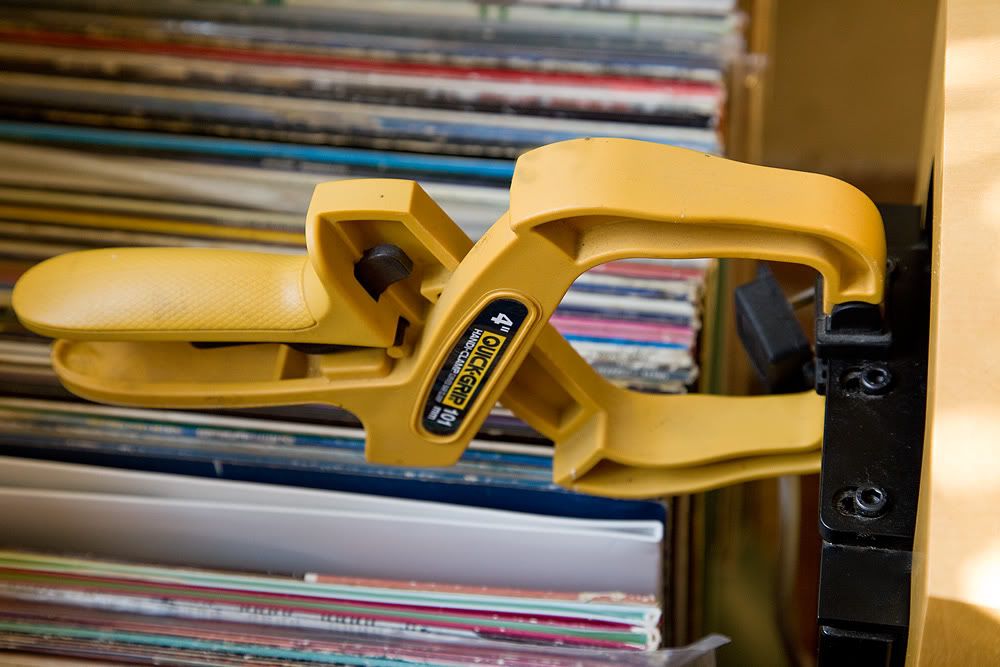
That's interesting, as I've never touched those bolts, and wasn't aware that you should/could. I always thought that you should move the wooden plate on the front.
Nigel, you shouldn't have to touch those bolts unless as a last resort or someone before has moved them. As it came from the factory, if moving the front shroud doesn't centre the tweeter then it may indicate a problem elsewhere in the setup.
I thought the bolts in the picture were for adjusting forwards / backwards movement of the tweeter to get it flush with the plate (as recommended) rather than for getting it central within the hole.
Ron, yes, it aligns the tweeter position but should be set pretty much perfectly at the factory and hence not need adjustment except in dire circumstances or as last resort.
I have my rig (about a dozen black boxes) on three Fraim stacks, between my SL2s. It isn't feasible for me to site the equipment any other way, but it sounds magnificent, so I shouldn't worry if you have to do that too.
Been a while since I had my SL2s, which were kind-of second-hand, but IIRC after ensuring the arm holding the tweeter's upright, those bolts enable you to position the tweeter spot-on within the upper enclosure. Seemed pretty straightforward to me...
Really interesting comments on here. I too acquired a beautiful pair of Cherry SL 2's four years ago to replace my 20+ year old SBL's, followed Richards brilliant set up guide andthey are truly exceptional. With regard to the carpet debate, I have a chipboard floor that is carpeted. I adopted the same solution as with my SBL's in that I used some 10 guage philips screws screwed hard down into the floor through the carpet and then sited the SL 2 spikes into these which gives a very stable set up. I'm a bit surprised no one has mentioned this solution, am I missing something here
PS: If I were to take the stanley knife to slit the carpet, I would fully expect to see my dear wife appear with a carving knife and "that look" in her eyes !!
Hi all,
My SL2s have arrived! Excellent service from the dealer and they were very well packed.
All I've done so far is opened the boxes and everything looks to be in order. The other top box is in its packaging!
I'm picking up 5m of NACA5 from my dealer tomorrow and still waiting for the Fraim chips which I'm told will be with me Wednesday so nothing I can do set up wise I guess until then. However it will give me a bit more time to prepare!
I'll keep you all posted.
Kind regards


Maple, same as mine. Gorgeous! They look mint, too. We're all dying to hear what you think of them once you've got the Fraim chips and you've set them up. Keep us posted.
I remember when I set mine up and on first listen thought 'That's disappointing. The bass doesn't sound anything like as good as the SBLs I had previously.'
Then I discovered that I'd stupidly connected the SL2s out of phase.... (not quite sure how I managed to do that!)
JohnL posted:Really interesting comments on here. I too acquired a beautiful pair of Cherry SL 2's four years ago to replace my 20+ year old SBL's, followed Richards brilliant set up guide andthey are truly exceptional. With regard to the carpet debate, I have a chipboard floor that is carpeted. I adopted the same solution as with my SBL's in that I used some 10 guage philips screws screwed hard down into the floor through the carpet and then sited the SL 2 spikes into these which gives a very stable set up. I'm a bit surprised no one has mentioned this solution, am I missing something here
PS: If I were to take the stanley knife to slit the carpet, I would fully expect to see my dear wife appear with a carving knife and "that look" in her eyes !!
JohnL, I've been using the cross head screw into the floorboards method for over 25 years since The Sound Org London installed my first set of Linn Kans and used just that method. Cheap and really makes a difference. Tricky to get them perfectly aligned though as the screws need to go into the spike holes dead straight. That's given me hours of frustration as every house I've ever owned always seems to have totally wonky suspended floors and of course you have to ensure you're not trying to screw into the gap between boards! The only reason it's feasible with my Isobariks is because you can site the stands first. I suspect with a large (heavy) floor stander it would be too much of an ask to get everything perfectly lined up so that you could get the speaker to sit nicely.
Try using socket-headed screws, makes it much easier to get the spikes settled.
Without wishing to be a pain, but the big metal plates (the floor stand bits) should not have been removed from the base of the speakers. The tweeters should not have been removed from the top of the support arm. I suggest you get precise instructions from Naim as to how to fit these together and you will certainly need a very good torque screwdriver. Getting the speaker rocking on the sprung base is critical to performance and I have a suspicion that they may have to go to Salisbury to be sorted out. I have no idea what whoever packed them was thinking of, and why they didn't simply follow the instructions. Sorry.
Oh dear. Thanks HH. I'd better give Naim a call. If I have to take them to the factory to be sorted it's not the end of the world as I'm not too far away in Bristol.
It sounds like a good check over would be well worth while. They can be absolutely fantastic speakers, but set-up is critical.
If it comes to it, S3, I think you just take them (packed) to your dealers and they do the rest. Naim don't have customers rocking up at head office anymore.
Hope you can get them sorted.
C.
HH is spot on. I looked at the photos and wondered why so many pieces. As long as it has been done with care should be no harm done.
They are lovely things so I'm sure will be worth it to get them installed by a dealer or re-assembled into the conventional set of components by Salisbury.
As for siting them the only thing I would add is that once set up and in position (no toe-in for me) I found they 'bedded in' and improved substantially over a week or more. Let this happen before tweaking position, chips etc. Mine are spiked into a wood floor. Not sure if it was just the spikes bedding in or that the speaker etc needed a bit of run in after several months in a box. I actually suspected the latter.
I struggle to see the logic of chips paced on top of carpet. Speaker is just floating on the carpet then surely?
Bruce
Mark, Tony, thank you for your replies (yes Mark, I too have suffered the frustrations of correct alignment), just wanted to know i was not "missing a trick" here. S3, they look fabulous, reminds me of when I first got mine home (after a 200 mile round trip to collect them after acquiring them from a famous auction site). I'm sure, with a bit of set up care (use Richards excellent instructions) they will blow you away. Keep us posted.
Mark, Tony, thank you for your replies (yes Mark, I too have suffered the frustrations of correct alignment), just wanted to know i was not "missing a trick" here. S3, they look fabulous, reminds me of when I first got mine home (after a 200 mile round trip to collect them after acquiring them from a famous auction site). I'm sure, with a bit of set up care (use Richards excellent instructions) they will blow you away. Keep us posted.
Thanks guys. I spoke with Customer Service at Naim. The view was that I should be able to re-attach the plinth and the tweeters to the arms myself so I will try to do that. If I am unable to get it right then I think I'll need to get them back to base via my dealer but I hope that will not be necessary. Let's see.
I have removed the plinths from the tweeter arms and put the bottom cabinet upside down. These are the fixings I have been supplied with:
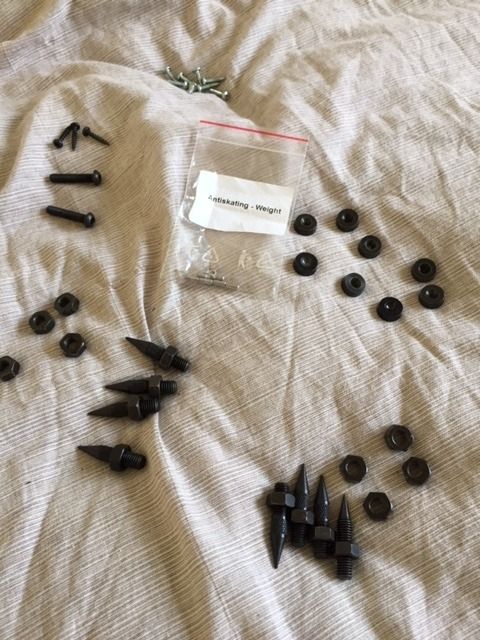
The 8 black items to the right of the PIPs are curious. I can only think that they are what the previous owner used to sit his spikes on (i.e. floor protector fraim alternatives).
Do the 8 black additional nuts sit above the plinth to hold the spikes in place so you end up with one nut above and one nut below the plinth in each spike corner?
I believe the 8 steel screws at the top of the picture are to screw the passive crossover units in place. The rubber doughnuts that Richard mentions in his instructions are sited on the corners of the crossovers themselves.
Below is where I've got to with fixing the base plinths:
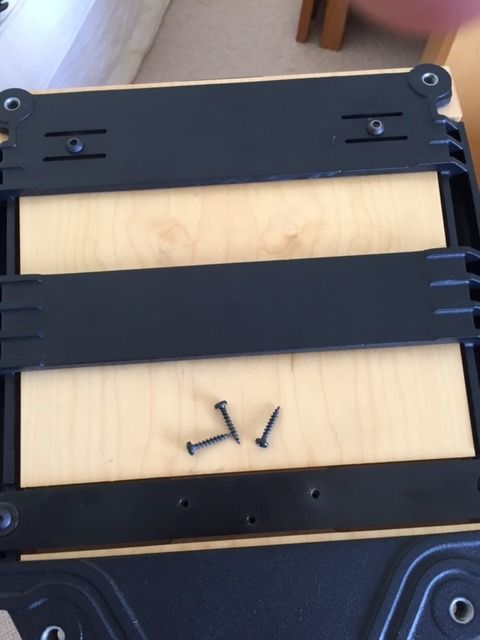
It seems straightforward. 2 blots screw in at the front and I assume that the three black screws fix the cross plat to the base of the cabinet? I'm aware that this plate needs to be "loose" so slightly confused as to how that is possible with the screws in place.
Any comments / observations gratefully received!
So I've got this far following the set up instructions:
 Clearly some adjustments needed. The tweeter plate was stuck fast and I am struggling to shift it. I don't want to use too much force pushing from the inside or pulling with the top box on its back in case I damage it.
It looks as though two adjustments are required:
(I) to raise the tweeter slightly; and
(ii) to bring it forward slightly to be flush with the plate
it looks ok in terms of its lateral position.
I made sure the tweeter arm was properly seated in the base at the start per the instructions but the only way I can think to raise the tweeter position is to raise the bar so that it would no longer be fully seated in its plinth brackets.
Is that what I need to do or is there another way to make these adjustments?
Many thanks in advance for your help!
Kind regards
You need to remove the plate. Brute force is required.
And the design brief was to make it an easier 'speaker to set up than SBLs...
Very interesting thread S3, and good pics too.
Stu