Naim Aro 'fishing line' length?
Posted by: Lewis on 21 November 2017
I wanted to check how long the little 'fishing line' with a weight at the end should be.
The reason I ask is because I recently saw a friends Aro, and his line weight actually sat on the arm board when the arm was in place on the arm rest? He also had the line set on the last 'notch' of the Aro (outer end towards the left side when looking from above).
My line is quite a bit shorter than his and does not touch the arm board when the arm is on the arm rest. Also I have to have it set on the inner most notch, otherwise when the needle approaches the centre of the record, the small weight at the end of the line is pulled right up to the small hole loop on the 'z' hanger, and would almost prevent the arm moving in any further.
I have seen another Aro where the line was the same length as mine, so I can only assume it is the 'z' hanger that needs to be 'tweaked' accordingly and bent into a more agreeable position. I did check photos online previously and I think it's set right though...
I'll post a picture later on, but if anyone can post advice based on my description above that would be good.
Thanks.
So long as the weight is off the board when the record is playing, it should make no difference. Naim can provide a definitive answer. Where the line attaches the outrigger on the arm depends on how much bias is required and will vary between cartridges.
Mine sits on the arm board at rest with just the slightest slack - not quite enough to detach the top loop from the arm, luckily. Basically you need it to be long enough to not foul on the hanger eye when it's on the highest setting and the arm is as close as it can get to the end of the record run out groove - if you listen to singles or EPs then that's often closer to the spindle than on an LP.
I’ve just checked my Aro arm and when the arm is on the rest the bias weight is resting on the arm board. My deck was set up by Derek Jenkins of Tangerine Audio and regarding a the loop it’s attached to the middle notch. This was where Derek set it up, cartridge is a Kiseki Blue NS.
Regards,
Martin
Mine is precisely 5cm long, as the Bishop said to the actress. It's on the middle notch and the weight just touches the board when the arm is at rest.
Thanks chaps.
My pals deck was set up by Peter @ Cymbiosis which leads me to believe that it is 100% correct!
I will measure mine this evening and see how long it is (oo err) ![]()
In the meantime, here is a pic from above to demonstrate how it appears. Please let me know if you can spot any obvious cock ups - thank you again for your wisdom gentlemen.
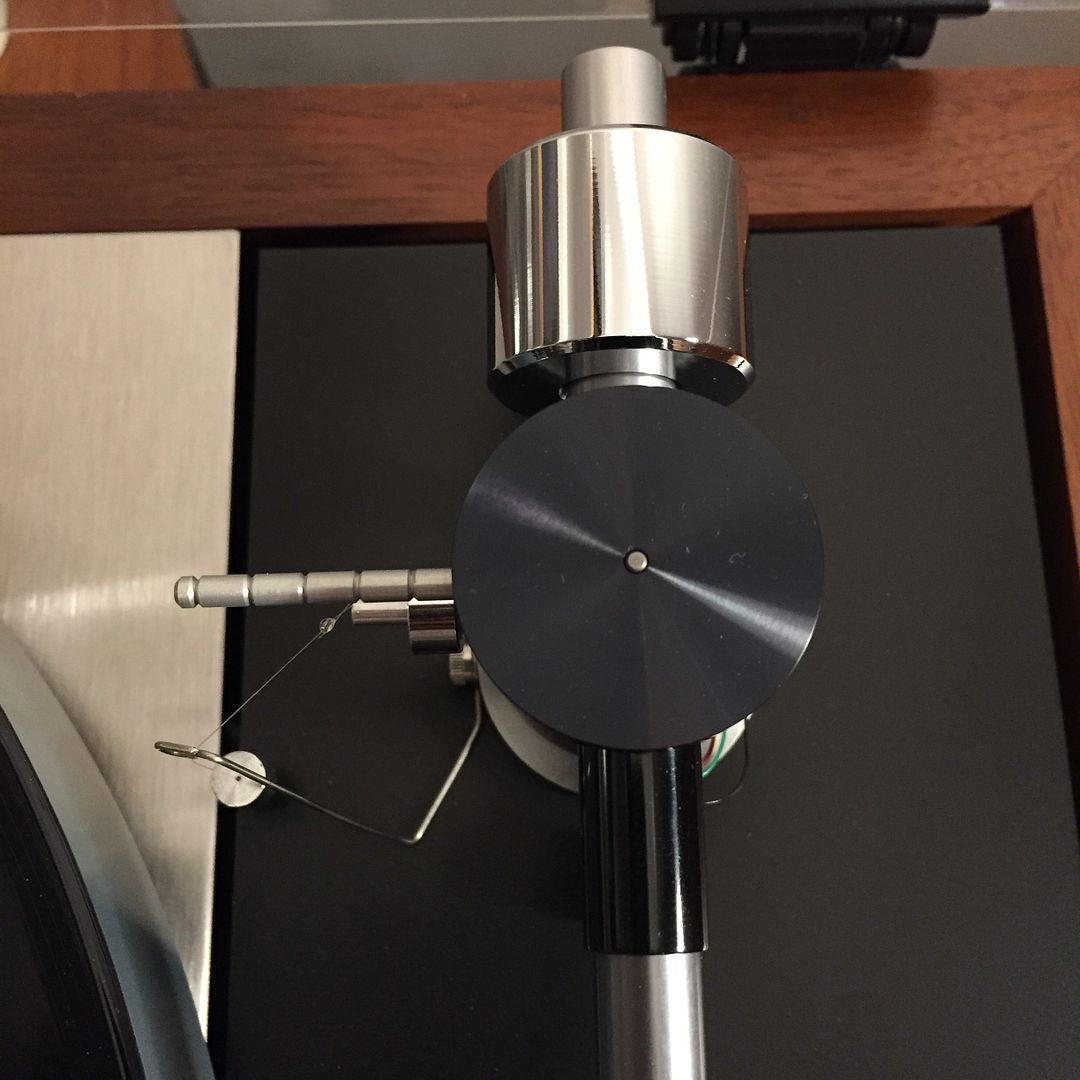
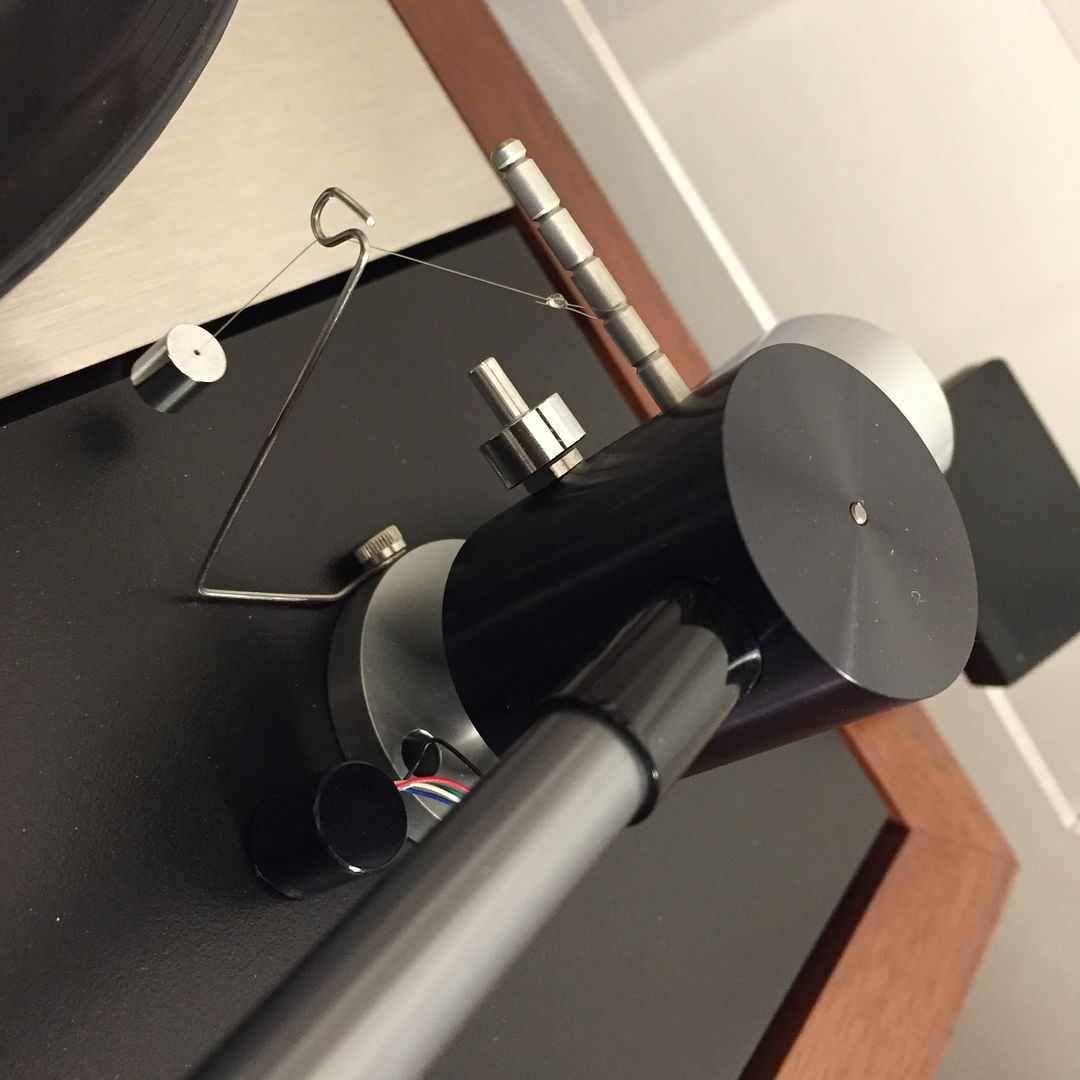
Mine hangs about 1.0mm off the armboard when on the rest, and it's hooked in the middle groove. Surely, it's also dependent on the position of the hanger eye.
Clive B posted:Mine hangs about 1.0mm off the armboard when on the rest, and it's hooked in the middle groove. Surely, it's also dependent on the position of the hanger eye.
Yes this is true, that's why I need to check if the hanger is correctly positioned as it's easily bent into position.
Did you try other settings? I found I could hear one that sounded best for whatever cartridge, there’s a fairly limited choice afterall.
I have a couple of little brass weights I was given with a little more mass, the idea being to use a groove nearer the pivot, this allowed the angle of the line to reach a right angle to the notched arm when the stylus was near the leadout grooves, with a bit of adjustment of the hanger, as this gave the highest anti-skate where the grooves were of smallest radii, which was reckoned to be where the skating effect was highest but it never sounded as convincing as the standard weight with the right angle formed at the beginning of the side using a notch further out.
It’s back in its box now anyway, my current arm uses a twisted thread to set antiskate. I ought to move it on to give someone else a chance but I know I’ll never find another.
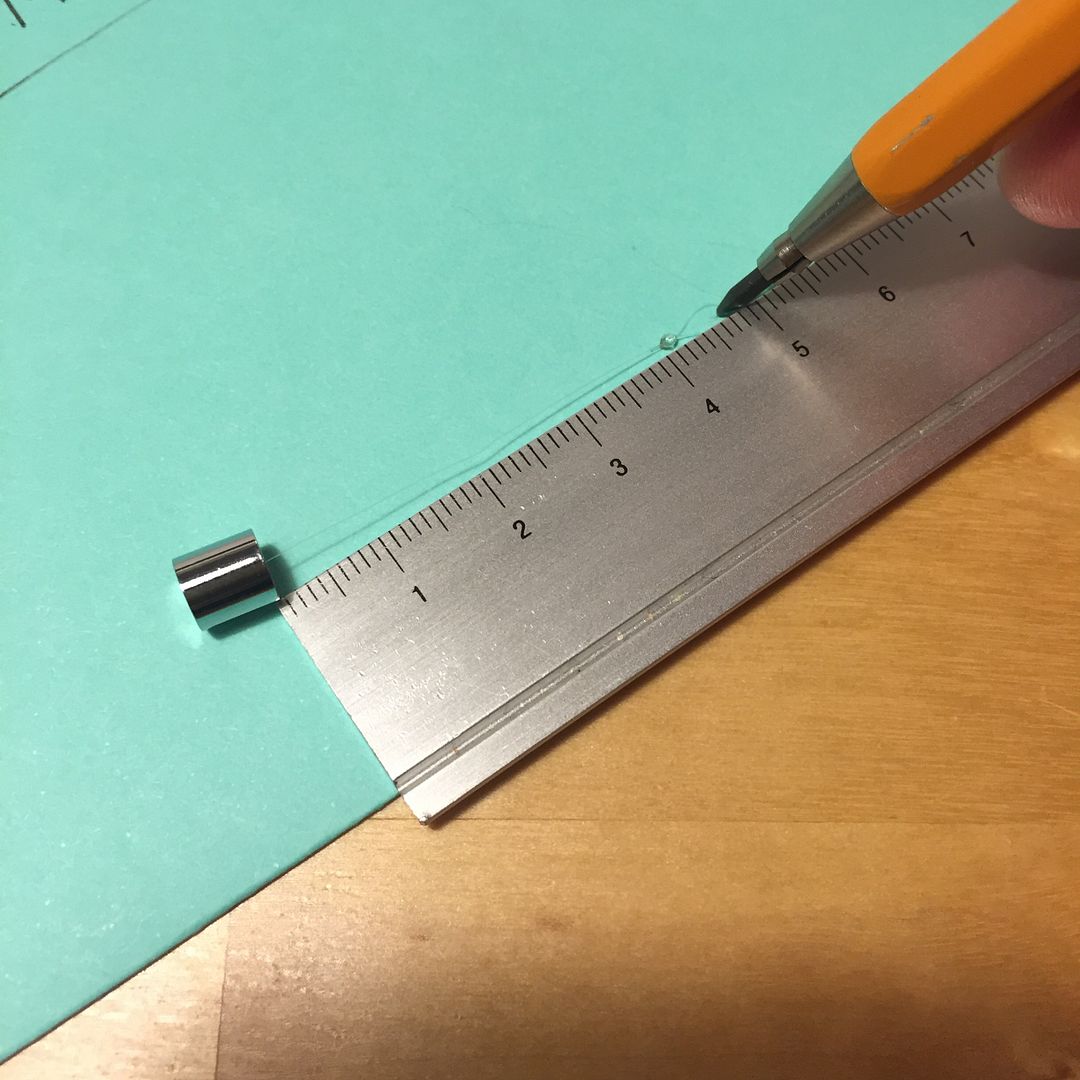
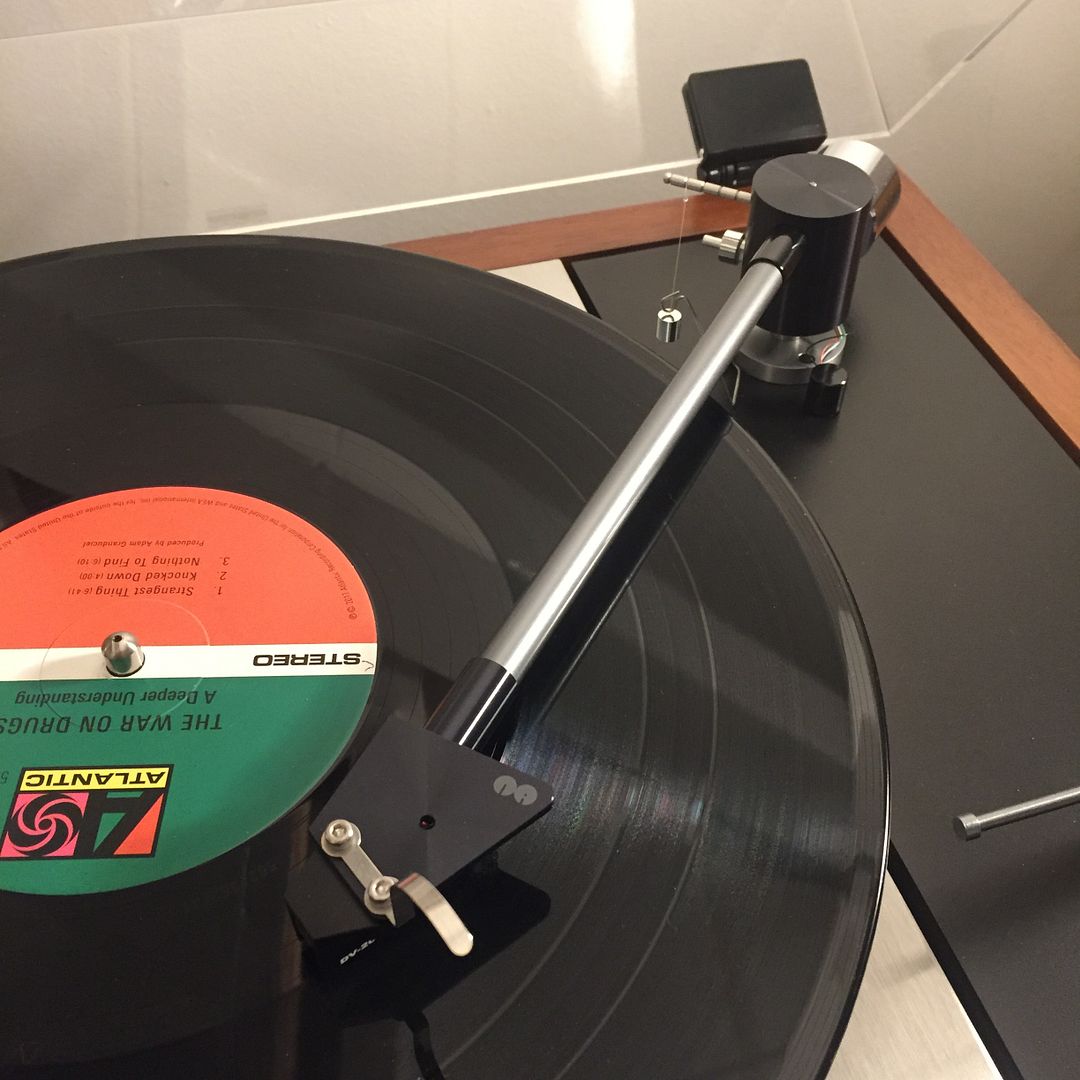
Ok I still can't seem to figure this out. I've attached some pics below to dhow the measurement of the line, and also some to show how stretched it is during record playback. The only way I see it can be solved is removal of the the loop hook and bending it slightly inward towards the counterweight direction to provide more 'slack' to the line. Opinions:
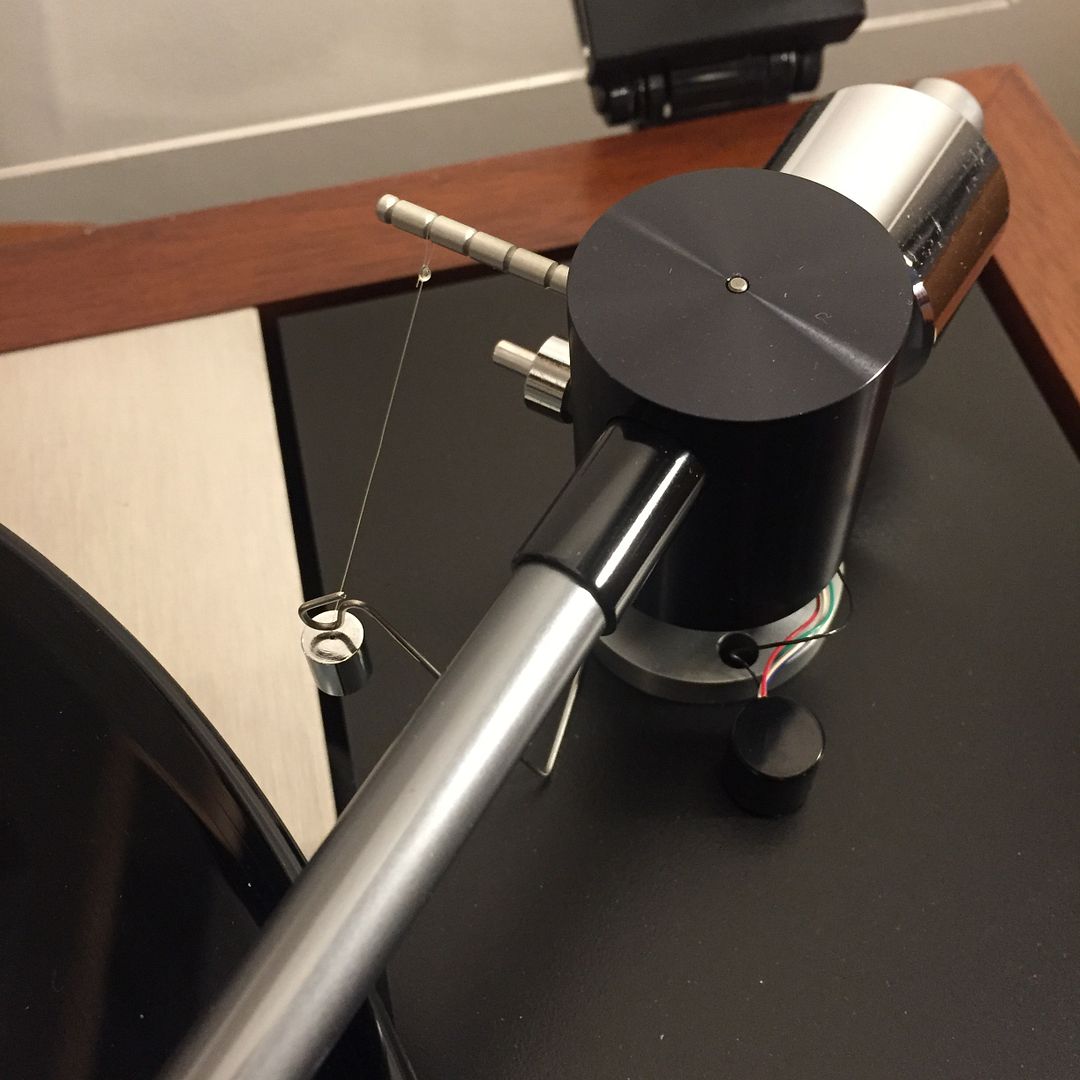
Lewis, it's not so easy to tell for sure in a photo but your hanger does look to be further out than my own. Then again, I recall we used to bend them a bit to get it positioned right so if that does the trick...
Don't forget the height of the arm above the arm board also affects this distance
Why not just adjust the distance of the wire loop from the notched bar untill it all works correctly?
Richard Dane posted:Lewis, it's not so easy to tell for sure in a photo but your hanger does look to be further out than my own. Then again, I recall we used to bend them a bit to get it positioned right so if that does the trick...
Ok thanks Richard. I will try and take another 'profile shot' later on to demonstrate how it sits.
I guess a light tweak with some needle nose pliers will do the trick, I just didn't want to mess with it unnecessarily you see, in case I had overlooked something.
Japtimscarlet posted:Don't forget the height of the arm above the arm board also affects this distance
Why not just adjust the distance of the wire loop from the notched bar untill it all works correctly?
the arm is perfectly level during playback which from research I assume to be correct, so I think this doesn't need to be adjusted.
I may have to adjust it yes, i'll do this later and come to you!
Does the line run horizontally to the hanger?
yeti42 posted:Does the line run horizontally to the hanger?
That's another excellent point to look for
Also
Google aro weigh arm tweek ...mark Dunn ..
I think if you have not already read the mods pages you will find them interesting...
Thanks gents.
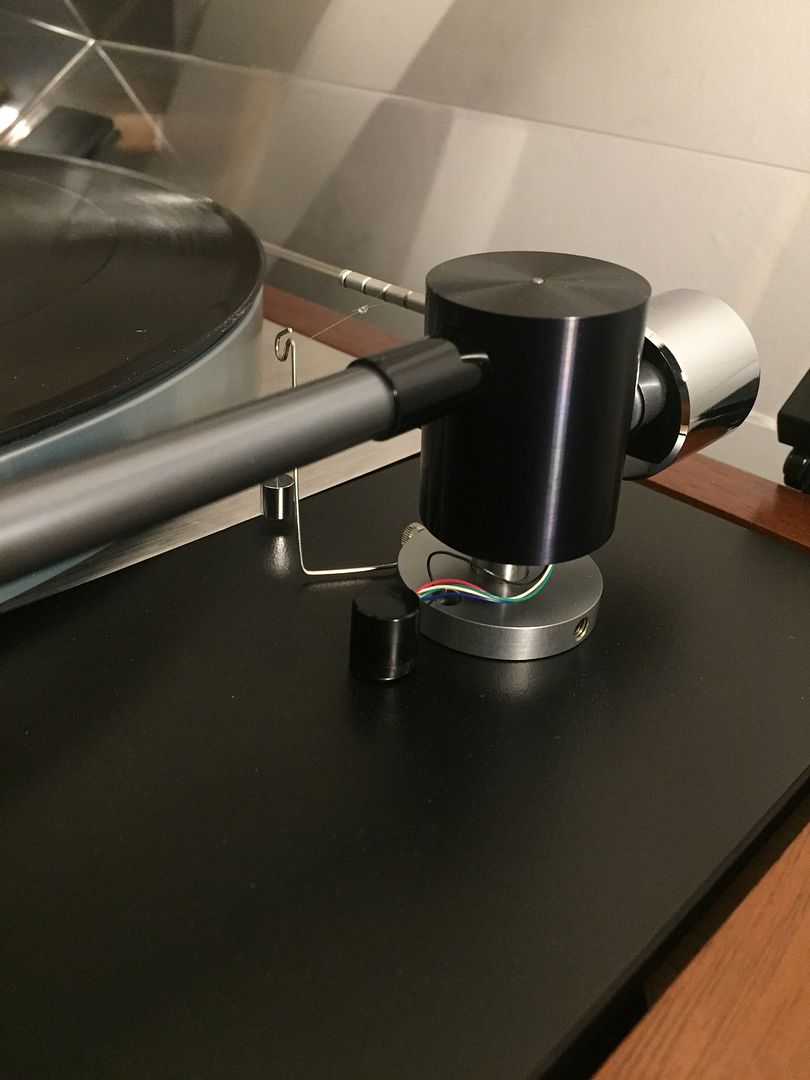
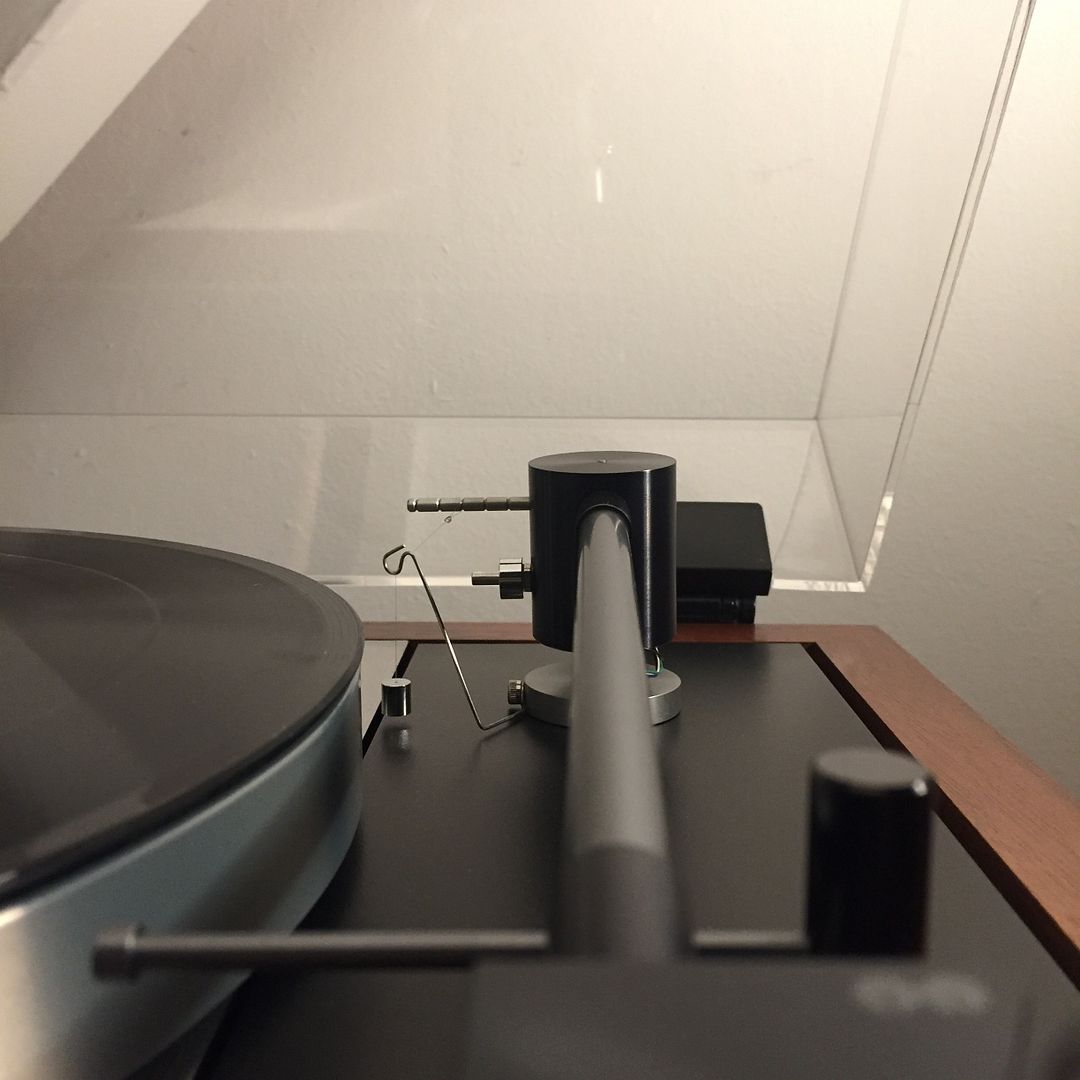
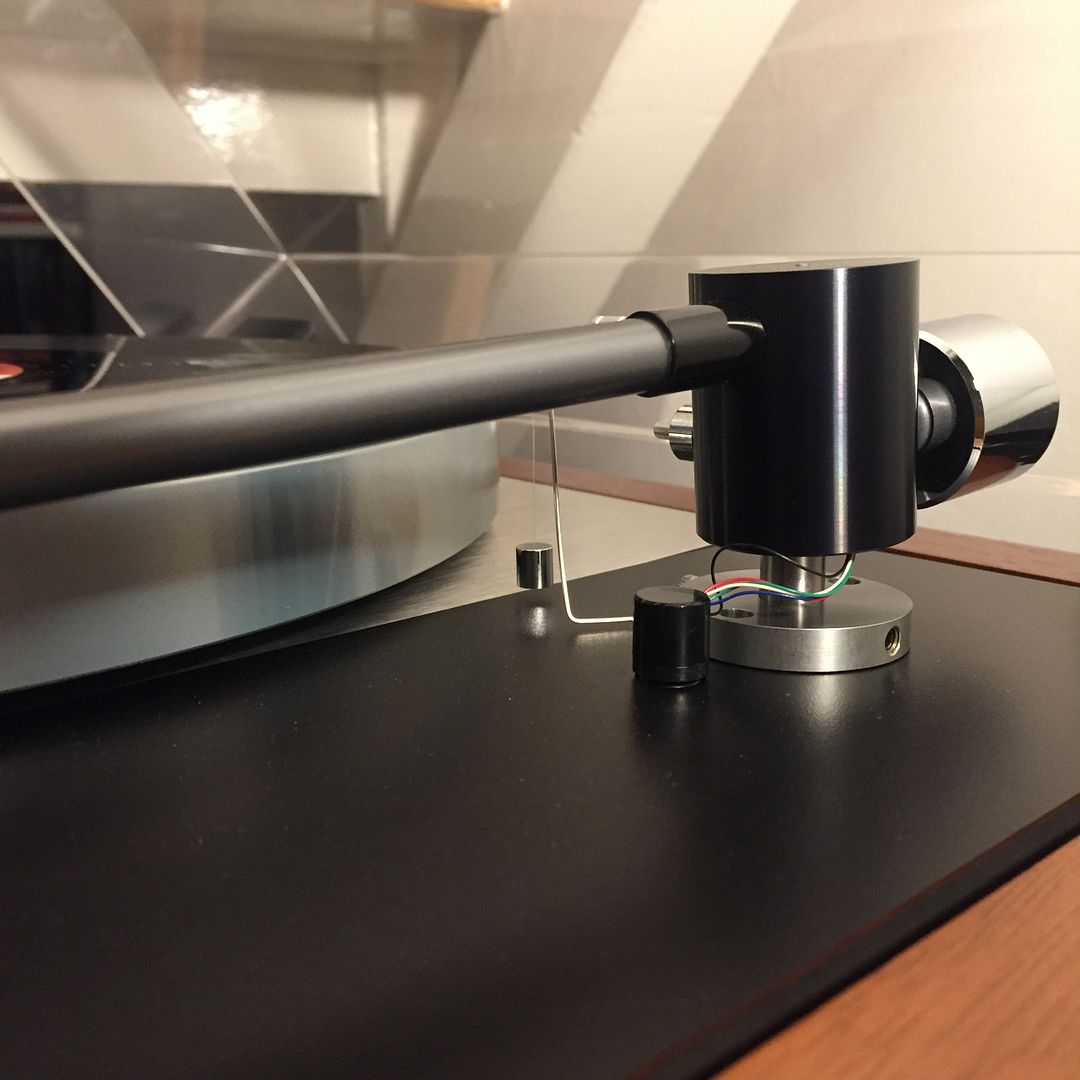
No I don't think the line runs parallel from the hanger, it heads down from the hanger to the loop at an angle. The reason being, when I was looking at photos online as to how the hanger should be positioned, the lower part of the hanger looked to run parallel to armboard which is how mine sits.
This photo borrowed from google demonstrates that, although it may be that I need to bring the hook loop closer to the line hanger like the second pic below:


The lower part of the line hanger looks to be elevated towards the kink from the armboard in these two photos, so perhaps there is no steadfast way it should be positioned?

Ok here are a few more photos to demonstrate the angle of the line hanger as discussed above.
See what you think please chaps.
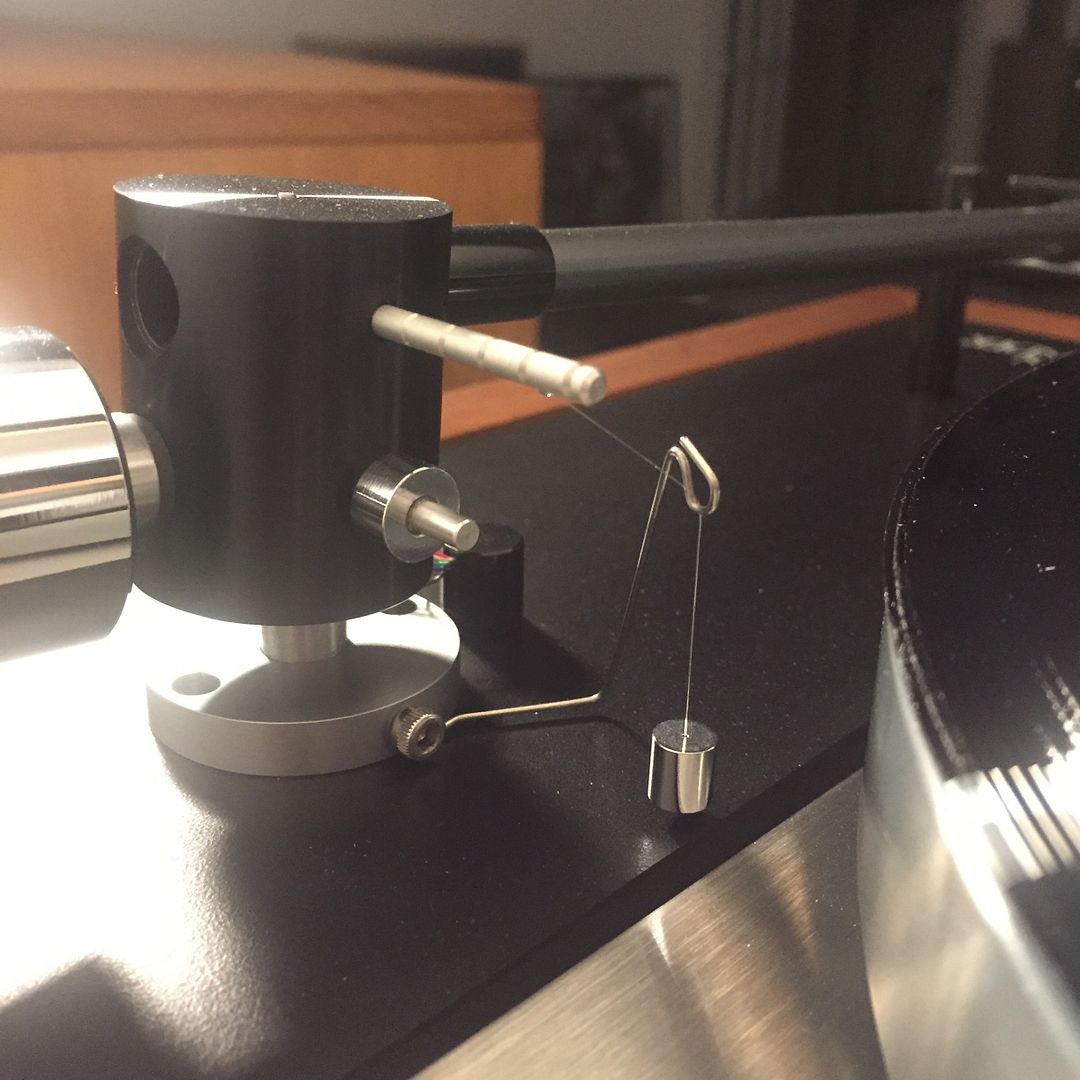
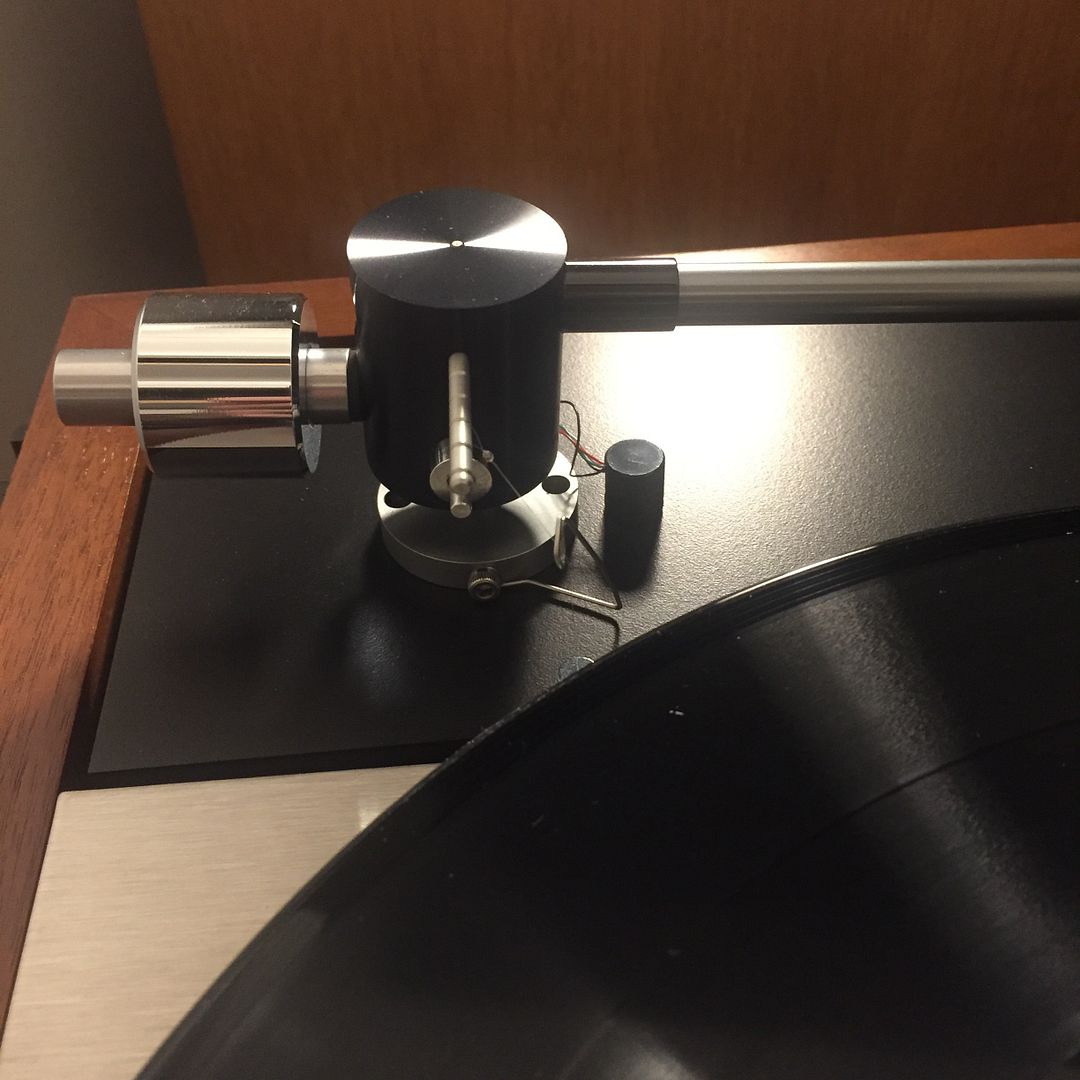
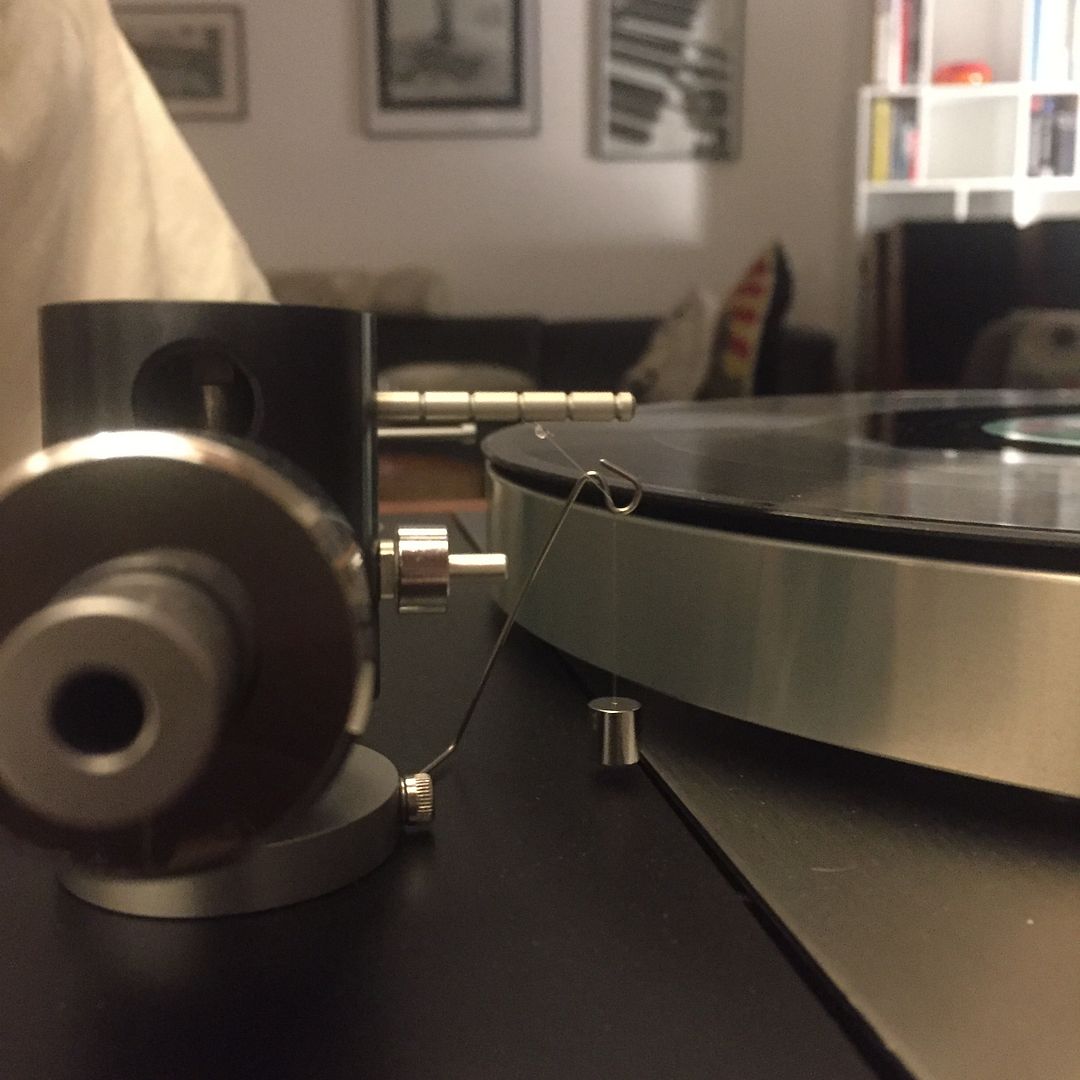
Lewis posted:Thanks gents.
No I don't think the line runs parallel from the hanger, it heads down from the hanger to the loop at an angle. The reason being, when I was looking at photos online as to how the hanger should be positioned, the lower part of the hanger looked to run parallel to armboard which is how mine sits.
Just spotted this thread. It is clear to me that the wire hangar needs to be positioned closer to the notched anti -skate bar on the Aro cup. As Richard has said in an earlier post, These can be easily adjusted/bent a little to achieve this and most likely this has moved in transit somehow, as one of the tests one always applies before removal of the top for travel is that the Aro will traverse fully across the LP without running the anti-skate weight to the top of the hangar. Additionally, the "line" should run parallel and it appears not to be, again suggesting some movement of the hangar.
Ordinarily the anti-skate weight will rest on the side of the arm-board and can sit in the gap between the arm-board and top-plate. Additionally, the anti-skate weight loop normally sits in the central notch or possibly the one further away from the cup depending on the down-force being applied. Ensure the wires from the Aro top are not touching the cup or the Aro collar as this can impede the movement of the top and remember the black wire is always longer and often more of a pain to dress due to it's different attachment position within the cup.
Having made any adjustments, always check azimuth and down-force please.
If you wish me to run over this more fully over the phone for you Lewis - No problem.
KR
Peter
Cymbiosis posted:Lewis posted:Thanks gents.
No I don't think the line runs parallel from the hanger, it heads down from the hanger to the loop at an angle. The reason being, when I was looking at photos online as to how the hanger should be positioned, the lower part of the hanger looked to run parallel to armboard which is how mine sits.
Just spotted this thread. It is clear to me that the wire hangar needs to be positioned closer to the notched anti -skate bar on the Aro cup. As Richard has said in an earlier post, These can be easily adjusted/bent a little to achieve this and most likely this has moved in transit somehow, as one of the tests one always applies before removal of the top for travel is that the Aro will traverse fully across the LP without running the anti-skate weight to the top of the hangar. Additionally, the "line" should run parallel and it appears not to be, again suggesting some movement of the hangar.
Ordinarily the anti-skate weight will rest on the side of the arm-board and can sit in the gap between the arm-board and top-plate. Additionally, the anti-skate weight loop normally sits in the central notch or possibly the one further away from the cup depending on the down-force being applied. Ensure the wires from the Aro top are not touching the cup or the Aro collar as this can impede the movement of the top and remember the black wire is always longer and often more of a pain to dress due to it's different attachment position within the cup.
Having made any adjustments, always check azimuth and down-force please.
If you wish me to run over this more fully over the phone for you Lewis - No problem.
KR
Peter
Hi Peter,
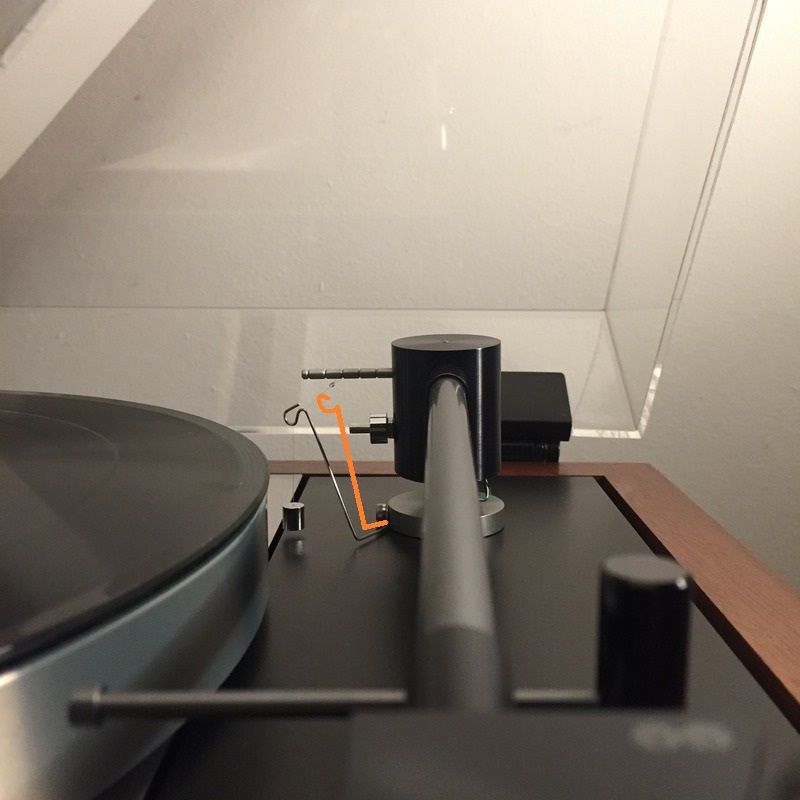
Ok thanks a bunch. Just to be clear, the photo you're using is one I procured via Google, but the others are mine. So I have marked up some drawings to show a proposed 'tweak' to the position, let me know if this looks correct.
The lower part of the arm before the first bend should run parallel to the armboard I think, but then it should bend to the left more then upwards towards the grooved line retaining bar.
Like so:
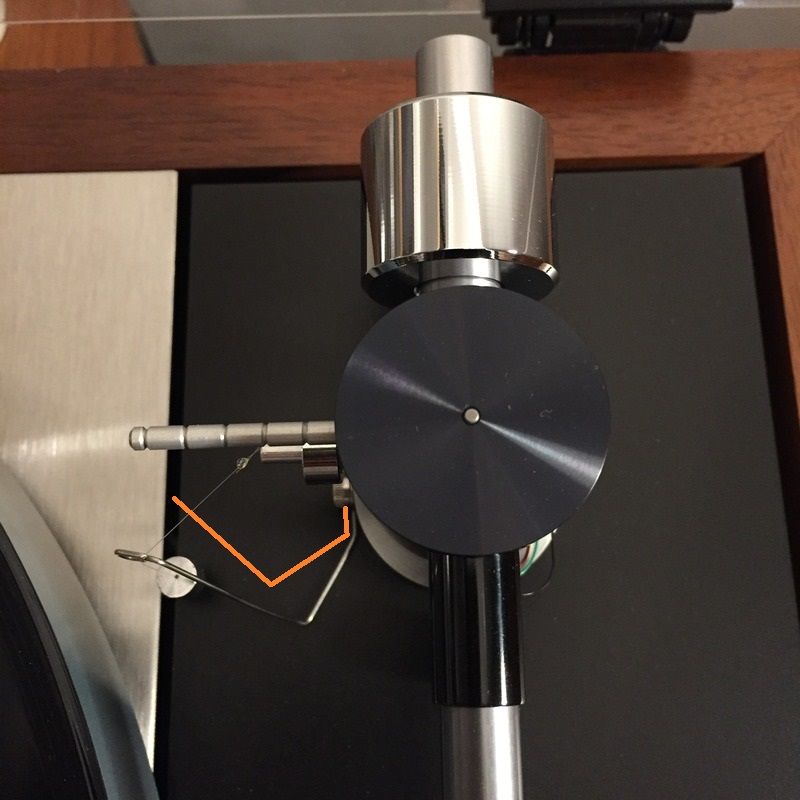
Much has been documented in the past on this subject which culminated in a 'white paper' by a forum member some years back. After much experimentation and knowledge of physics he determined that:
1. The thread should run parallel to the arm tube when viewed from above when the stylus is in the lead-in groove.
2. The thread should run parallel to the centre-line of the arm tube when viewed from the side (left) with stylus on a record.
To achieve the above it should be noted that as cartridges vary considerably in height some adjustments (bending and rotating at the collar attachment) of the hanger is necessary. Being made of stainless steel it is fairly easy and risk free, though in practice the springiness of the metal requires that one has to bend beyond the chosen point and then it relaxes. There is no need to remove the hanger just do it in situ. Make sure the stylus guard is on!
Also to achieve 1. the thread must be positioned in the middle notch on the bias bar thus necessitating an adjustment to its mass. This can be achieved by either adding a small piece of Blu-tak or as we did, having replacement weights made (as per Yeti's post earlier that we supplied).
Depending on the cartridge's height you will find that the hanger may well need to be both rotated upwards upon its bolt axis and then bent away from the cup to achieve the correct height of the loop so the thread is parallel in both planes.
As noted earlier, the weight's thread must be long enough to not allow the weight to make contact with the hanger at end of side. It matters not if the weight makes contact with the armboard at rest but must not at any other time.
The above methodology is how I always set mine and my customer's Aros with audibly superior results and what's more, repeatable, leaving nothing to guesswork or luck, although any change in cartridge dimension would mean starting over.
As Peter points out it is absolutely essential that the arm wires are dressed correctly so as to make no contact whatsoever with anything as this will have a detrimental effect on sound. I use a small Allen key to gently manipulate the wires. Depending on the particular sample I find that the wires may need to be dressed two on one side of the pillar and two on the other with the longer black ground wherever it can go without touching any other wires or metal parts. Sometimes though they rest all on one side as per the photos above. Be sure not to allow these wires to act like a spring though, they should be relaxed and not taught.
Fiddly it may be but well worth the effort for sure.
Good luck
Simon
Simon Walker posted:Much has been documented in the past on this subject which culminated in a 'white paper' by a forum member some years back. After much experimentation and knowledge of physics he determined that:
1. The thread should run parallel to the arm tube when viewed from above when the stylus is in the lead-in groove.
2. The thread should run parallel to the centre-line of the arm tube when viewed from the side (left) with stylus on a record.
To achieve the above it should be noted that as cartridges vary considerably in height some adjustments (bending and rotating at the collar attachment) of the hanger is necessary. Being made of stainless steel it is fairly easy and risk free, though in practice the springiness of the metal requires that one has to bend beyond the chosen point and then it relaxes. There is no need to remove the hanger just do it in situ. Make sure the stylus guard is on!
Also to achieve 1. the thread must be positioned in the middle notch on the bias bar thus necessitating an adjustment to its mass. This can be achieved by either adding a small piece of Blu-tak or as we did, having replacement weights made (as per Yeti's post earlier that we supplied).
Depending on the cartridge's height you will find that the hanger may well need to be both rotated upwards upon its bolt axis and then bent away from the cup to achieve the correct height of the loop so the thread is parallel in both planes.
As noted earlier, the weight's thread must be long enough to not allow the weight to make contact with the hanger at end of side. It matters not if the weight makes contact with the armboard at rest but must not at any other time.
The above methodology is how I always set mine and my customer's Aros with audibly superior results and what's more, repeatable, leaving nothing to guesswork or luck, although any change in cartridge dimension would mean starting over.
As Peter points out it is absolutely essential that the arm wires are dressed correctly so as to make no contact whatsoever with anything as this will have a detrimental effect on sound. I use a small Allen key to gently manipulate the wires. Depending on the particular sample I find that the wires may need to be dressed two on one side of the pillar and two on the other with the longer black ground wherever it can go without touching any other wires or metal parts. Sometimes though they rest all on one side as per the photos above. Be sure not to allow these wires to act like a spring though, they should be relaxed and not taught.
Fiddly it may be but well worth the effort for sure.
Good luck
Simon
Simon, thanks for taking the time to type such a detailed reply, and you Peter!
I will have a fiddle with it over the weekend. I have dressed the cables correctly already and they make no contact whatsoever, so I will focus on the arm hanger then it should be perfect. Just to clarify the picture above with 'messy' cabling is from a google search, not mine ![]()
It is interesting that I also use a small allen key - Normally a 1.5mm key to make the cable adjustments below the cup - It makes the job so much easier.
KR
Peter
Cymbiosis posted:It is interesting that I also use a small allen key - Normally a 1.5mm key to make the cable adjustments below the cup - It makes the job so much easier.
KR
Peter
Funny, me too. I also use it to 'hook' the line on and off as it's a fiddly job otherwise!
